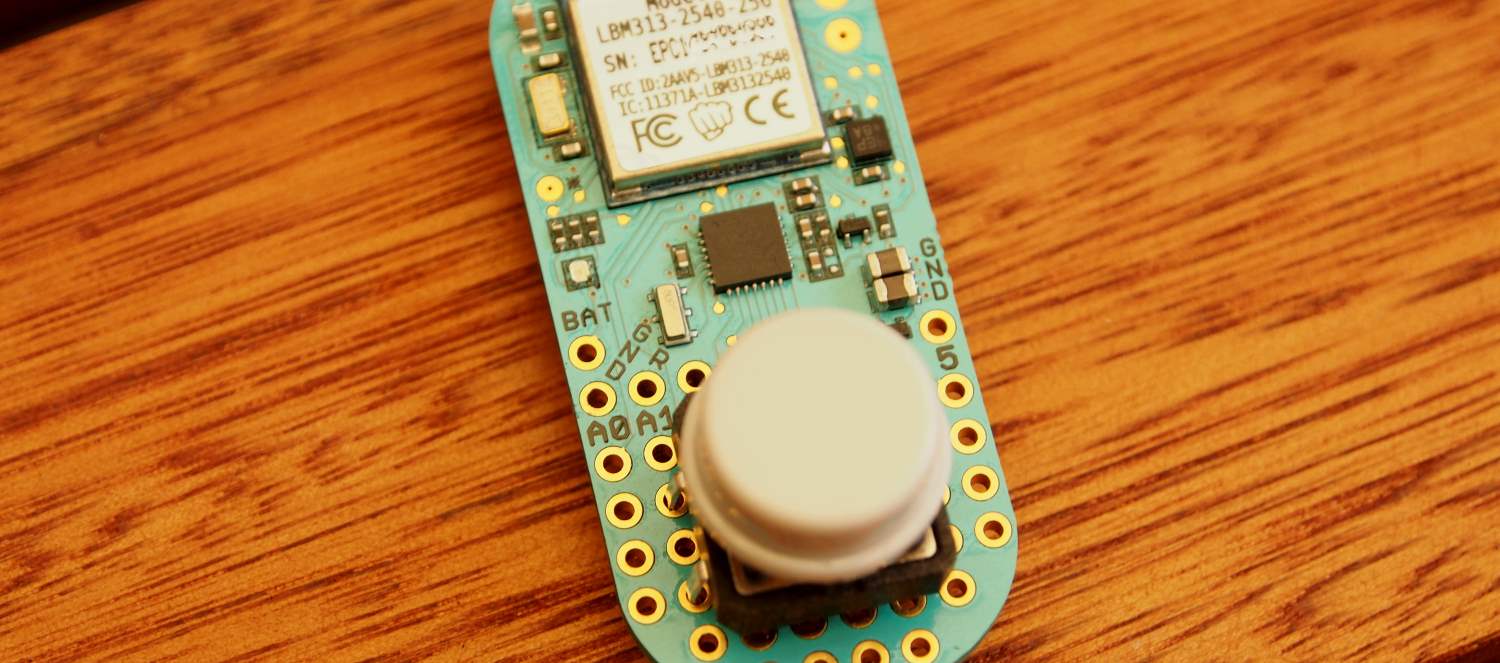
The Light Blue Bean built by Punch Through Design is a versatile Arduino device with Bluetooth Low Energy (BLE) built in. The Bean’s default 3v battery could typically last a month when running a minimal sketch. A door bell button is possibly the simplest arduino device you could possibly build. A press of the button would notify an android device through BLE that someone is at the door. This post will provide an idea on how this could be built using minimal power (on the Bean) and minimal code.
Why use iBeacon?
The two typical ways for a Bean to talk with another device such as an iPhone or Android phone is either to use a virtual serial connection or scratch characteristics. Both ways have their advantages and disadvantages against each other. Virtual serial tends to be for real time communication whereas the scratch characteristics are more for lower frequency, fire and forget updates. Both methods require an active connection between the Bean and the other device, and you could only have one connection at a time. What if you want several devices to receive the door bell notification?
There is a third way – Using iBeacon. iBeacon is an Apple developed protocol that piggy backs off BLE. It broadcasts messages to all nearby BLE-capable devices. The common use-case is to broadcast advertisements and special offers to shoppers that have arrived at a retail shop housing an iBeacon. The Light Blue Bean allows iBeacon mode to be activated.
iBeacon piggy backs of BLE advertisements which the Bean is constantly sending every 500ms, to tell nearby devices that it is alive. Hence embedding messages within these broadcast advertisements carry very little extra cost to power. These advertisements are also passively received by all nearby devices, hence allowing multiple devices to receive and respond to messages. No connection is required. However, the downsides compared to the two aforementioned ways of communication are that:
- Communication is only one-way – Bean to phone
- There is no pairing connection, hence no encryption
- The Bean only allows 6 bytes of user-adjustable data transmission (2-bytes of the UUID, 2-bytes Major, 2-bytes Minor)
These limitations however are fine for the an IoT door bell. We only need a boolean in our message – button is pressed or button is not pressed.
It may also be wise to consider security implications – There are two security issues:
- An attacker can spoof the BLE advertisements, sending prank door bell rings – a minor annoyance
- An attacker can monitor door bell rings – which if they are in range, they could just as well see that there are people at the front door
Both of these issues could be mitigated by adding encryption or some HOTP based system, but that’s out of the scope of this project.
Building the Door Bell Button
The button is basically a Bean that monitors a click, which is when a circuit is closed. It is based off the simple Arduino code which wires up a PIN D0 to a switch and then the ground. Setting D0 to INPUT_PULLUP allows us to avoid using an external pull-up (or pull-down) resistor, but means that when the pin D0 is HIGH, it is an open circuit, the button is not pressed. When the pin D0 is LOW, the button is pressed.
We have manually enabled iBeacon using the Bean Loader, entering the default parameters for the iBeacon device. These parameters are changeable in Arduino using setBeaconParameters. This will allow us to indicate whether the button is pressed or not. It is important that you have in setup() Bean.enableConfigSave(false); as by default, the Bean writes to non-volatile memory every time BLE settings are changed. This memory is only rated up to 20,000 write cycles. In this example, we will set minor_id to 1 if the button is pressed, 0 if the button is not pressed. We toggle the flag for a period of three seconds to ensure our signal is read by the Android device.
[code]
if (digitalRead(0) == LOW) {
Bean.setBeaconParameters(BEACON_UUID, 0, 1);
delay(3000);
Bean.setBeaconParameters(BEACON_UUID, 0, 0);
}
[/code]
You may notice that delay() is used instead of Bean.sleep(). The reason is that we want execution to be paused for a full 3 seconds. Bean.sleep() could be interrupted by events, such as the one which we are setting up next.
To maximise power savings, we want the Arduino controller to be sleeping until there are events to respond to, such as a button press. Hence we use attachPinChangeInterrupt in setup() that wakes the Arduino controller when D0 changes from HIGH to LOW or vice-versa. triggerDoorbell method is empty as we want to keep our logic in loop()
[code]
attachPinChangeInterrupt(0, triggerDoorbell, CHANGE);
[/code]
In our loop we will add sleep(MAX_SLEEP), MAX_SLEEP being a constant 0xFFFFFFFF. As mentioned, Bean.sleep() will be interrupted by pin changes.
[code]
Bean.sleep(MAX_SLEEP);
[/code]
During testing, I found a delay of 3 to 4 seconds in the broadcasting of the new BLE advertisement after pressing the button. After a bit of trial and error, toggling enableAdvertising seemed to fire a new BLE advertisement with the new beacon values immediately.
[code]
if (digitalRead(0) == LOW) {
Bean.enableAdvertising(false);
Bean.setBeaconParameters(BEACON_UUID, 0, 1);
Bean.enableAdvertising(true);
delay(3000);
Bean.enableAdvertising(false);
Bean.setBeaconParameters(BEACON_UUID, 0, 0);
Bean.enableAdvertising(true);
}
[/code]
Here is the final Arduino sketch. setLed was added for debugging purposes, as well as some simple debouncing logic.
[code]
#include <PinChangeInt.h>
int MAX_SLEEP = 0xFFFFFFFF;
uint16_t BEACON_UUID = 0x1234;
void setup() {
Bean.enableConfigSave(false);
pinMode(0, INPUT_PULLUP);
attachPinChangeInterrupt(0, triggerDoorbell, CHANGE);
Bean.enableAdvertising(false);
Bean.setBeaconParameters(BEACON_UUID, 0, 0);
Bean.enableAdvertising(true);
}
void loop() {
if (digitalRead(0) == LOW) {
// debounce
Bean.sleep(200);
if (digitalRead(0) == LOW) {
Bean.enableAdvertising(false);
Bean.setBeaconParameters(BEACON_UUID, 0, 1);
Bean.enableAdvertising(true);
Bean.setLed(255,255,255);
delay(3000);
Bean.enableAdvertising(false);
Bean.setBeaconParameters(BEACON_UUID, 0, 0);
Bean.enableAdvertising(true);
Bean.setLed(0,0,0);
}
}
Bean.sleep(MAX_SLEEP);
}
void triggerDoorbell() {
// sleep interrupted, loop() should run
}
[/code]
Writing an Android iBeacon Detector
On the Android side, we need to build an iBeacon detector, which is basically a BLE scanner. BLE support began in Android 4.3, but the APIs were improved in Android 5.0 lollipop. Using BluetoothLeScanner we can scan for BLE advertisements, which will contain the UUID, major and minor IDs that we set earlier. From that point, we just need to check if minor is 0 or 1, then we can show a door bell notification.
Using BluetoothLeScanner, we created a wrapper class BeaconScanner that emits BeaconInfo every time a beacon is detected. To minimise the delay between the button press and the bell ringing, we set the SCAN_MODE_LOW_LATENCY flag. This reduces the delay to less than a second. Without it, the delays ranges from less than a second to a few seconds. The downside is that it uses more power.
BeaconScanner.java
[java]
package net.loune;
import android.bluetooth.BluetoothAdapter;
import android.bluetooth.BluetoothDevice;
import android.bluetooth.le.BluetoothLeScanner;
import android.bluetooth.le.ScanCallback;
import android.bluetooth.le.ScanRecord;
import android.bluetooth.le.ScanResult;
import android.bluetooth.le.ScanSettings;
import android.util.SparseArray;
import java.nio.ByteBuffer;
import java.util.Arrays;
import java.util.UUID;
/**
* Created by loune on 26/12/2015.
*/
public class BeaconScanner {
private BluetoothAdapter bluetoothAdapter;
private BluetoothLeScanner bluetoothLeScanner;
private OnBeaconDetectedListerner listener;
public void setListener(OnBeaconDetectedListerner listener) {
this.listener = listener;
}
protected ScanCallback scanCallback = new ScanCallback() {
@Override
public void onScanResult(int callbackType, ScanResult result) {
BluetoothDevice device = result.getDevice();
ScanRecord scanRecord = result.getScanRecord();
SparseArray<byte[]> manufacturerData = scanRecord.getManufacturerSpecificData();
if (manufacturerData.size() == 0) {
return;
}
int manufacturerId = manufacturerData.keyAt(0);
byte[] data = manufacturerData.get(manufacturerId);
if (data.length < 23) {
return;
}
int rssi = result.getRssi();
double dist = calculateAccuracy(data[22], (double) rssi);
byte[] uuid = Arrays.copyOfRange(data, 2, 18);
BeaconInfo info = new BeaconInfo(
device.getName(),
device.getAddress(),
(short)manufacturerId,
(short)(((data[0] & 0xFF) << 8) | (data[1] & 0xFF)),
getUUIDFromByteArray(uuid),
(short)(((data[18] & 0xFF) << 8) | (data[19] & 0xFF)),
(short)(((data[20] & 0xFF) << 8) | (data[21] & 0xFF)),
data[22],
rssi,
dist);
if (listener != null)
listener.onBeaconDetected(device, info);
}
};
public BeaconScanner() {
bluetoothAdapter = BluetoothAdapter.getDefaultAdapter();
}
public void startScan() {
bluetoothLeScanner = bluetoothAdapter.getBluetoothLeScanner();
if (bluetoothLeScanner == null) {
// bluetooth not enabled?
return;
}
ScanSettings settings = new ScanSettings.Builder()
.setReportDelay(0)
.setScanMode(ScanSettings.SCAN_MODE_LOW_LATENCY)
.build();
bluetoothLeScanner.startScan(null, settings, scanCallback);
}
public void endScan() {
bluetoothLeScanner.stopScan(scanCallback);
bluetoothLeScanner = null;
}
// http://stackoverflow.com/questions/20416218/understanding-ibeacon-distancing
// returns approximate iOS distance in metres
protected static double calculateAccuracy(int txPower, double rssi) {
if (rssi == 0) {
return -1.0; // if we cannot determine accuracy, return -1.
}
double ratio = rssi*1.0/txPower;
if (ratio < 1.0) {
return Math.pow(ratio,10);
}
else {
double accuracy = (0.89976)*Math.pow(ratio,7.7095) + 0.111;
return accuracy;
}
}
private static UUID getUUIDFromByteArray(byte[] bytes) {
ByteBuffer bb = ByteBuffer.wrap(bytes);
long high = bb.getLong();
long low = bb.getLong();
UUID uuid = new UUID(high, low);
return uuid;
}
public interface OnBeaconDetectedListerner {
void onBeaconDetected(BluetoothDevice device, BeaconInfo beaconInfo);
}
}
[/java]
BeaconInfo.java
[java]
package net.loune;
import java.util.UUID;
/**
* Created by loune on 26/12/2015.
*/
public class BeaconInfo {
private String name;
private String address;
private short manufacturerId;
private short beaconCode;
private UUID beaconUUID;
private short major;
private short minor;
private int referenceRssi;
private int rssi;
private double distance;
public String getName() {
return name;
}
public String getAddress() {
return address;
}
public short getManufacturerId() {
return manufacturerId;
}
public short getBeaconCode() {
return beaconCode;
}
public UUID getBeaconUUID() {
return beaconUUID;
}
public short getMajor() {
return major;
}
public short getMinor() {
return minor;
}
public int getReferenceRssi() {
return referenceRssi;
}
public int getRssi() {
return rssi;
}
public double getDistance() {
return distance;
}
public BeaconInfo(String name, String address, short manufacturerId, short beaconCode, UUID beaconUUID, short major, short minor, int referenceRssi, int rssi, double distance) {
this.name = name;
this.address = address;
this.manufacturerId = manufacturerId;
this.beaconCode = beaconCode;
this.beaconUUID = beaconUUID;
this.major = major;
this.minor = minor;
this.referenceRssi = referenceRssi;
this.rssi = rssi;
this.distance = distance;
}
}
[/java]
Using BeaconScanner
BeaconScanner exposes an event handler, allowing you to set a OnBeaconDetectedListerner. In our listener, we sound a notification when we detect a beacon with Minor = 1.
[java]
BeaconScanner scanner = new BeaconScanner();
scanner.setListener(new BeaconScanner.OnBeaconDetectedListerner() {
long ignoreUntil = 0;
@Override
public void onBeaconDetected(BluetoothDevice device, BeaconInfo beaconInfo) {
if (beaconInfo.getMajor() == 0 && beaconInfo.getMinor() == 1) {
if (ignoreUntil > System.currentTimeMillis())
return;
// play sound and show snack bar notification
try {
Uri notification = RingtoneManager.getDefaultUri(RingtoneManager.TYPE_NOTIFICATION);
Ringtone r = RingtoneManager.getRingtone(getApplicationContext(), notification);
r.play();
} catch (Exception e) {
e.printStackTrace();
}
Snackbar.make(fab, "GET THE DOOR", Snackbar.LENGTH_LONG)
.setAction("Action", null).show();
// ignore any beacons for the next 3.5 seconds (as we send bursts in the bean)
ignoreUntil = System.currentTimeMillis() + 3500;
}
}
});
scanner.startScan();
[/java]
A button for anything really.
Although, this example is for a simple door bell, it can really be used as a simple remote trigger for anything, like a wireless presenter, as long as you are aware of the issues surrounding security.
Hey there!
I’m trying to adopt your tutorial to create a two-button device that will write an entry into an SQLite database in an android app, based on which button is pressed. I’m pretty new to both Arduino and Android / Java, so your tutorial has been an invaluable help! However, I’m having a bit of a problem with the last code block you’ve posted, under “Using BeaconScanner”. Where am I supposed to add this code? Trying to add it anywhere in my MainActivity file throws up a ton of errors.
@Kyle The block of code can be put in any method you want to start the bluetooth scan and connect such as onCreate or button click events. What errors are you getting?
Right now, I have it placed on the first line in the onCreate method in my main activity. Here were the errors I was having. I think I managed to fix most of them, I’ll let you know if it worked or if I’m still stuck.
BeaconScanner.OnBeaconDetectedListerner gets an error, says “Class ‘Anonymous class derived from OnBeaconDetectedListerner must either be declared abstract or implement abstract method ‘OnBeaconDetected (BluetoothDevice, BeaconInfo)’ in ‘OnBeaconDetectedListerner'”. This seems to be fixed by removing the @Override on line 4.
Had an error on line 5 with onBeaconDetected, but I think I just had to re-direct the reference (I had it in a separate class)
Line 12 – 14: Can not resolve the symbols Uri, RingtoneManager, or play
Line 18: can not resolve symbol fab
I’m probably going to have to replace everything in those last two sections so I’m not too concerned with those.
I managed to fix all the errors, but I can’t seem to get the app and the arduino to communicate.
Here’s my current arduino code: https://github.com/MarrotteK/MasterCut/blob/master/arduino_code/mastercut/mastercut.ino
The lights turn green and red depending on which button is pressed, so I assume the arduino isn’t the problem.
And here’s my segment of android code in my main activity: http://pastebin.com/BLErvNWY
All the rest of my code is either unrelated or taken from your tutorial. If I understand everything correctly, when I press the first button, the arduino should blink green and my app should show the “It works!” toast. However, currently, no such toast shows up.
Any advice where it might be breaking down?
After a day of trying to debug it, I’ve learned that since Android 6.0, permissions have gotten a lot more complicated, so in order to use beacons, you need to enable your app to get the ACCESS_FINE_LOCATION and ACCESS_COARSE_LOCATION permissions. Even fixing that, however, didn’t get my code to work.
I’ve added some logging notes to see where it gets lost. It seems that the scanner does start in the BeaconScanner class, but in my main activity, onBeaconDetected never seems to actually start.